

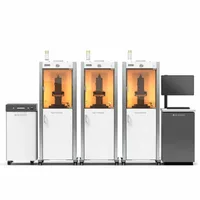
The 3D Systems Figure 4 is an industrial DLP platform designed for production: not just prototyping. Its modular architecture scales from a single unit to a multi-station manufacturing cell, and a broad portfolio of functional resins covers applications from medical to aerospace.
What it is
Figure 4 is named after Charles Willson Peale's legendary four-point mechanism: a symbol of precision and balance. In practice it is a DLP (Digital Light Processing) system in which a UV projector cures an entire layer of resin at once rather than tracing a contour, achieving extremely short layer times. The key innovation is the non-contact membrane separation process: no sticking or tearing: enabling Z-axis build speeds up to 100 mm/h. The machine is sold in three variants: Standalone, Semi-Automated and Automated Production Unit, all sharing the same resin portfolio and the Post-Cure Unit (PCU) post-processing station.
Technical specifications
| Technology | DLP (Digital Light Processing): non-contact membrane |
|---|---|
| Build volume | 125 × 70 × 200 mm (per module) |
| Z-axis build speed | up to 100 mm/h |
| Material system | 3D Systems Figure 4 resins (closed system) |
| Scalability | Standalone → Semi-Auto → Automated Production Unit (multi-station cell) |
| Post-processing | Post-Cure Unit (PCU): UV curing, required for final mechanical properties |
| Class / Price | Industrial · from ~€25,000 |
Applications and industries
- End-use part manufacturing (functional components from engineering resins with repeatability and quality comparable to injection moulding) directly from a digital file without expensive tooling (Electronics and consumer goods)
- Dental and medical applications (surgical guides, orthodontic models and biocompatible components from certified resins) with precision below 50 microns (Medical and dental industry)
- Investment casting patterns (burnout patterns for precision metal casting) zero ash on burnout, high detail accuracy for jewellery and aerospace (Jewellery and aerospace)
Production workflow
- Prepare the resin: shake the cartridge, verify resin temperature (recommended 25–30°C). Homogeneous resin without sediment, ensures uniform density and consistent mechanical properties in the part.
- Inspect the membrane and FEP coating of the tray: no scratches, contamination or residual resin. A clean membrane ensures non-contact separation and protects the DLP projector from UV scatter.
- Start the DLP print: the machine layers at 50–100 microns, the UV projector cures each layer simultaneously. Full-layer curing achieves speeds up to 100 mm/h, orders of magnitude faster than point-scanning SLA.
- After printing: remove the part, rinse with IPA or DEF in the Material Wash Unit for 10–15 min. Removes uncured resin from the surface and hidden cavities, mandatory step before UV post-cure.
- Place the part in the Post-Cure Unit (PCU): programmed UV + heat per material profile. Final UV curing develops the full mechanical and thermal properties of the resin, without this step the part is brittle.
Key considerations
Materials and applications
Pick a material/alloy this machine processes to see its properties and typical applications:
Conclusion
The Figure 4 is 3D Systems' answer for the production floor, not the prototyping department. The non-contact DLP process, modular scalability and broad portfolio of certified resins make it cost-effective for small and medium series of end-use parts: especially where injection moulding is too expensive or too slow for validation.
The full picture
This article is one page from The Big Book of 3D Printing: 704 illustrated pages covering every technology, material and fix in one reference.
Read it on Kindle →Engineer, author of The Big Book of 3D Printing and additive manufacturing expert