

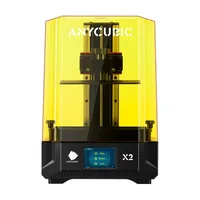
The Anycubic Photon Mono X2 is a mid-range mono LCD resin printer aimed at beginners and hobbyists seeking high detail at an affordable price. With a build volume of 192×120×245 mm, a monochrome 9.1″ screen and print speeds up to 80 mm/h, the X2 proves that precise resin printing is no longer a privilege reserved for expensive machines.
What it is
The Photon Mono X2 uses MSLA (Masked Stereolithography) technology: a monochrome LCD panel projects ultraviolet light across an entire layer at once. This is a fundamental difference from FDM: instead of melting and extruding plastic, liquid photopolymer resin is cured by UV light layer by layer. The monochrome matrix (unlike RGB) passes more UV power and lasts significantly longer. The result is exceptional detail: down to 0.05 mm in the XY axes, at an accessible price of around €219. The machine is ideal for miniatures, jewellery master models and dental protocols where FDM cannot achieve the required precision.
Technical specifications
| Technology | Mono LCD / MSLA (UV 405 nm) |
|---|---|
| Build volume | 192 × 120 × 245 mm |
| XY resolution | 0.048 × 0.048 mm |
| Screen size | 9.1″ monochrome LCD |
| Print speed | up to 80 mm/h |
| Class / Price | Hobby · ~€219 |
Who it’s for
- Miniatures and figurines (RPG heroes, wargaming miniatures and collectible figurines with details below 0.1 mm) impossible with FDM (Hobby and collecting)
- Jewellery master models: precise wax or castable models for subsequent casting in silver, gold or bronze (Jewellery and art)
- High-detail prototypes: architectural scale models, electronics enclosures and consumer products with smooth surfaces (Design and architecture)
- Dental splints and study models: temporary dental splints, orthodontic models and surgical guides with dental resin (Dental medicine)
Setup and calibration
- Check platform leveling: loosen the bolts, place a sheet of paper between the FEP and the platform and re-tighten with even pressure. Even spacing across the entire surface guarantees reliable first-layer adhesion.
- Run an exposure validation test (Exposure Validation Matrix or RERF test) with your resin. Optimal Normal Exposure Time found: no under-curing or loss of detail.
- Inspect the FEP film for clouding, scratches and pinholes against the light. Clear, undamaged FEP: ensures even UV transmission and prevents leakage.
- Fill the vat to the level marked in the manual: approximately 2/3 of maximum capacity. The correct resin level prevents overflow and ensures stable pressure during lift.
Common defects and fixes
Resin exposure helper
Pick a resin type for starting exposure values (typical for mono-LCD machines). These are STARTING points: always run an exposure test, because the exact seconds depend on your screen power and the specific resin:
Conclusion
The Photon Mono X2 is a solid entry point into the world of resin 3D printing. The monochrome panel delivers speed and longevity, the build volume handles the majority of hobby projects, and the price of around €219 makes it hard to beat in its class. If you already own an FDM printer and want to add high detail to your arsenal, the X2 is the logical next step.
The full picture
This article is one page from The Big Book of 3D Printing: 704 illustrated pages covering every technology, material and fix in one reference.
Read it on Kindle →Engineer, author of The Big Book of 3D Printing and additive manufacturing expert