

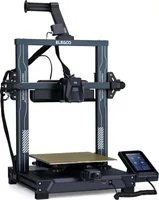
The Elegoo Neptune 4 Pro is an open bedslinger printer in the budget class, powered by Klipper and capable of speeds up to 500 mm/s. For under €300 it delivers automatic bed leveling, Input Shaper vibration compensation and a flexible, maker-friendly profile: an ideal starter machine for PLA, PETG and TPU at a genuine production pace.
What it is
The Neptune 4 Pro is a budget FDM printer with an open frame and a moving bed (bedslinger). The Klipper firmware runs on a dedicated Raspberry Pi-based module, giving access to the Mainsail/Fluidd interface, macros and advanced Input Shaper calibration directly from a browser. The open construction (no enclosure) makes it well-suited for PLA, PETG and TPU but imposes limitations on materials like ABS and PC that require a stable thermal environment. The printer targets enthusiasts and small workshops that value speed and tunability over out-of-the-box automation.
Technical specifications
| Technology | FDM (Bedslinger, open frame) |
|---|---|
| Build volume | 225 × 225 × 265 mm |
| Maximum speed | up to 500 mm/s |
| Firmware | Klipper (Mainsail/Fluidd) |
| Calibration | automatic bed leveling + Input Shaper |
| Enclosure / AMS | no enclosure, no AMS |
| Class / Price | Hobby · ~€299 |
Who it’s for
- Rapid Prototyping: iterative printing of early-stage designs to test shape, fit and ergonomics before committing to production (Product Design and Engineering)
- Custom Jigs and Fixtures: manufacturing durable tools and alignment templates to assist workers on assembly lines (Automotive and Manufacturing)
- Educational Models: printing models and mechanical components for STEM laboratories to teach additive manufacturing processes (Education)
Calibration step by step
- Clean the heated platform with isopropyl alcohol (IPA) and run the automated bed leveling process. The system generates an accurate digital mesh of the bed's topology to automatically compensate for minor surface deviations during printing.
- Fine-tune the Z-offset manually using a piece of paper to gauge resistance between the nozzle and the bed. The nozzle achieves the optimal distance from the bed, guaranteeing perfect first-layer adhesion without excessive squish.
- Calibrate the extruder steps (E-steps) by commanding 100 mm of extrusion and measuring the actual filament consumed. The extruder feeds the exact required amount of filament, preventing systemic under-extrusion or over-extrusion.
- Run the Input Shaper resonance test through the Klipper interface. The firmware profiles the mechanical vibrations of the X and Y axes, neutralizing ringing artifacts during high-speed operations.
Common defects and fixes
Recommended settings by material
Pick a material to see the recommended temperatures (empirical ranges from 561 OrcaSlicer/Bambu profiles) plus machine-specific tips:
Conclusion
The Neptune 4 Pro is an honest budget choice for enthusiasts who want Klipper, high speed and tunability without spending over €300. The open frame makes it excellent for PLA, PETG and TPU but sets real limits on ABS and engineering polymers. If your primary material is PLA or PETG and value for money is the priority: the Neptune 4 Pro delivers.
The full picture
This article is one page from The Big Book of 3D Printing: 704 illustrated pages covering every technology, material and fix in one reference.
Read it on Kindle →Engineer, author of The Big Book of 3D Printing and additive manufacturing expert