

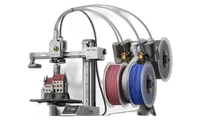
The Bambu Lab A1 mini is a compact open-frame FDM printer with a 180×180×180 mm build volume, designed from the ground up to be the ideal first 3D printer. Automatic calibration handles all the technical side, while the optional AMS Lite adds automatic switching of up to 4 colors: all at a price under €200.
What it is
The A1 mini is a bedslinger printer: the bed moves forward and backward on the Y axis while the toolhead moves on X and Z. The small build volume is a trade-off, but the machine compensates with a low price, exceptional ease of use and a full feature set. It prints PLA, PETG and TPU without effort, and beginners never have to spend a day dialing in calibration. Because the frame is open, high-warping materials like ABS and PC are practically unsuitable, and they don't need to be, since the machine is positioned for hobby and education rather than engineering polymers.
Technical specifications
| Technology | FDM (Bedslinger, open frame) |
|---|---|
| Build volume | 180 × 180 × 180 mm |
| Maximum speed | up to 500 mm/s |
| Nozzle | standard brass 0.4 mm |
| Calibration | automatic: leveling, Flow Dynamics, Z-offset |
| Multi-material | AMS Lite (optional), up to 4 spools |
| Class / Price | Hobby · ~€200 |
Who it’s for
- Rapid prototyping: creating prototypes to verify form, fit and ergonomics within hours (Product design and engineering)
- Education and STEM projects: use in school labs for visual learning and bringing projects from idea to physical object thanks to the accessible price and ease of use (Education)
- Multi-color figurine printing: printing detailed figurines and miniatures with AMS Lite for automatic switching of up to 4 filament colors (Hobby and creativity)
Calibration step by step
- Clean the PEI plate with isopropyl alcohol (IPA). An oil-free surface guarantees excellent first-layer adhesion.
- Run automatic bed leveling (Auto-leveling). Automatic compensation of micro-irregularities across the plate for correct first-layer deposition.
- Run Flow Dynamics / Pressure Advance calibration in Bambu Studio or OrcaSlicer. Optimal flow at corners and sharp direction changes: no blobs or under-extrusion.
- Check and fine-tune Z-offset during the first layer print. First layer pressed firmly to the plate without elephant's foot (if too low) or detachment (if too high).
Common defects and fixes
Recommended settings by material
Pick a material to see the recommended temperatures (empirical ranges from 561 OrcaSlicer/Bambu profiles) plus machine-specific tips:
Conclusion
The A1 mini is perhaps the easiest entry into the world of 3D printing: compact, affordable and fully auto-calibrated. The AMS Lite option makes it surprisingly capable for multi-color printing. For PLA, PETG and TPU it is an excellent choice; for engineering polymers you will need an enclosed printer with a larger build volume.
The full picture
This article is one page from The Big Book of 3D Printing: 704 illustrated pages covering every technology, material and fix in one reference.
Read it on Kindle →Engineer, author of The Big Book of 3D Printing and additive manufacturing expert