

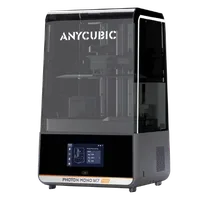
The Anycubic Photon M7 Pro is a desktop MSLA printer with a 14K mono LCD panel engineered for maximum detail at an accessible price. With a 224×126×220 mm build volume and a 14 456×8160 pixel resolution, it targets miniature painters, dental professionals and jewellers seeking DLP-class precision at a hobbyist price point.
What it is
The Photon M7 Pro operates on the Masked Stereolithography (MSLA) principle: a UV diode illuminates the entire layer at once through a monochrome LCD matrix rather than scanning with a laser. The monochrome panel transmits more light than older RGB LCD panels – layers cure in 1–2 seconds, and the panel life is 4–5 times longer. “14K” describes the horizontal pixel count: the result is an XY resolution of around 15 µm – sufficient for dental crowns, jewellery wax masters and 28 mm miniatures with visible rivets.
Technical specifications
| Technology | MSLA (Mono LCD, 14K) |
|---|---|
| Build volume | 224 × 126 × 220 mm |
| Resolution | 14 456 × 8160 px (≈ 15 µm XY) |
| Screen size | 10.1-inch mono LCD |
| Layer thickness | 0.01 – 0.2 mm |
| Class / Price | Hobby · ~€480 |
Who it’s for
- Miniatures and figurines – detailed gaming miniatures with visible chainmail, raised inscriptions and expressive faces – 15 µm XY leaves no room for compromise (Tabletop gaming and collectibles)
- Dental models and splints – anatomically precise dental arch models, surgical guides and temporary crowns from dental resin (Dentistry)
- Jewellery wax masters – burnout wax or castable resins for gold and silver jewellery production via the lost-wax casting method (Jewellery and goldsmithing)
- Precision prototypes – visual and concept prototypes with exceptionally smooth surfaces requiring minimal post-processing (Product design)
Setup and calibration
- Level the build plate (“paper test”): place a sheet of paper between the FEP film and the platform, tighten the bolts evenly. Uniform light resistance across the whole surface – ensures homogeneous adhesion for the first layers.
- Run an exposure test (Resin XP Test or CHITUBOX Exposure Range Finder) with your specific resin. Find the minimum layer exposure time at which details are crisp and delamination-free – the baseline for every other setting.
- Inspect and clean the FEP film; replace it if cloudy or mechanically damaged. A clear, undamaged FEP ensures uniform UV penetration and clean layer release.
- Keep the resin level in the vat between the min and max marks; stir thoroughly before use. Correct level prevents vacuum suction-cup failures and ensures consistent resin density.
Common defects and fixes
Resin exposure helper
Pick a resin type for starting exposure values (typical for mono-LCD machines). These are STARTING points – always run an exposure test, because the exact seconds depend on your screen power and the specific resin:
Conclusion
The Photon M7 Pro is a compelling argument that 14K detail is no longer the privilege of industrial machines. For miniature painters, dental technicians and jewellers willing to work with liquid resins, it offers exceptional precision within an accessible budget. The key to success is the right resin choice, dialled-in exposure and FEP maintenance – everything else the printer handles on its own.
The full picture
This article is one page from The Big Book of 3D Printing: 704 illustrated pages covering every technology, material and fix in one reference.
Read it on Kindle →Engineer, author of The Big Book of 3D Printing and additive manufacturing expert