

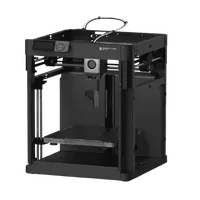
The Bambu Lab P1P is an open-frame CoreXY FDM printer in the prosumer class, built for speed and modularity at an accessible price. With a 256×256×256 mm build volume, speeds up to 500 mm/s and automatic calibration, the P1P delivers the X1C series core without an enclosure: making it ideal for rapid prototyping and upgrading at your own pace.
What it is
The P1P is the more accessible sibling of the P1S: they share the same CoreXY motion system and automated calibration, but the P1P ships from the factory without an enclosure. That openness is its strength: you can print PLA, PETG and TPU straight out of the box, and when you need engineering materials you can add the official Panel Upgrade Kit to get a closed chamber close to what the P1S offers. The AMS multi-material system is an optional add-on, not included. The printer targets makers and designers who want Bambu reliability and speed without paying for the flagship.
Technical specifications
| Technology | FDM (CoreXY, open frame: enclosable with Panel Upgrade Kit) |
|---|---|
| Build volume | 256 × 256 × 256 mm |
| Maximum speed | up to 500 mm/s |
| Nozzle | standard brass (hardened: optional) |
| Calibration | automatic: leveling, Input Shaper, Flow Dynamics |
| Multi-material | AMS: optional (up to 4 spools) |
| Class / Price | Prosumer · ~€500 |
Who it’s for
- Rapid prototyping: iterating physical designs to verify form and fit at high speed with minimal setup (Industrial design and R&D)
- Jigs and fixtures: manufacturing assembly tools and guides from PETG or ABS (with panels fitted) (Automotive and manufacturing)
- Educational models: producing tangible components for STEM projects, robotics and mechanical assemblies (Education)
Calibration step by step
- Clean the flexible PEI build plate with isopropyl alcohol (IPA). A grease-free surface guarantees maximum first-layer adhesion.
- Initiate the automatic bed leveling sequence from the printer menu or Bambu Studio. The toolhead probes multiple points and builds a mesh for a flawless first layer across the full bed.
- Run the machine resonance calibration (Input Shaping). The printer compensates for vibrations and eliminates ghosting at speeds up to 500 mm/s.
- Run the Flow Dynamics calibration (Pressure Advance) in Bambu Studio. Smooth and consistent extrusion on corners and seams: no blobs or gaps.
Common defects and fixes
Recommended settings by material
Pick a material to see the recommended temperatures (empirical ranges from 561 OrcaSlicer/Bambu profiles) plus machine-specific tips:
Conclusion
The P1P is the smart choice for a maker who wants Bambu speed and automation at half the X1C price. The open frame is a feature, not a flaw: PLA, PETG and TPU run perfectly without extras, and when ABS, ASA or engineering polymers are needed the Panel Upgrade Kit transforms it into an enclosed machine. The AMS is available as an add-on for multi-material printing. The distinction from the P1S is straightforward: the P1P ships open, the P1S ships enclosed.
The full picture
This article is one page from The Big Book of 3D Printing: 704 illustrated pages covering every technology, material and fix in one reference.
Read it on Kindle →Engineer, author of The Big Book of 3D Printing and additive manufacturing expert